Introduction to RepoQuest
RepoQuest is an experimental tool for interactive programming tutorials. Each lesson takes place in a Git repository hosted in a local instance (running in Docker) of the Forgejo Git forge. RepoQuest uses the Forgejo interface for issues and pull requests to provide starter code and explain programming concepts.
This documentation consists of two parts. The first part describes how to install and run RepoQuest for a learner following a quest. The second part describes how to create quests for quest authors.
Following quests
This section of the documentation covers running RepoQuest for a learner.
Setting up RepoQuest in the first place requires several steps, described in the following sections. Once running, RepoQuest imitates the normal way of interacting with a Git forge such as GitHub or Forgejo, so using RepoQuest should feel familiar to most users.
Requirements
Docker or Podman is required follow a quest using RepoQuest.
Starting the RepoQuest environment
To start the RepoQuest environment using Docker, clone the RepoQuest repository. In the root of the repository run
docker compose up --build --detach
To start RepoQuest using Podman, clone the repository and in the root of the repository run
podman compose up --build --detach
You can control the port that RepoQuest uses for its HTTP server with the
RQ_PORT environment variable and the port used for its SSH server with the
RQ_SSH_PORT environment variable. For example,
RQ_PORT=8000 RQ_SSH_PORT=2022 docker compose up --build --detach
Once that command returns successfully, you can access RepoQuest at http://localhost:8085/ (adjusting the port number according to how you configured it).
You will need to register so that RepoQuest knows your email address (for
correctly associating commits). To clone from and push to the RepoQuest
instance, you can either use the username and password you registered with
(e.g., git clone http://username:password@localhost:3000/username/repo.git) or
you can register an SSH with RepoQuest key in the user preferences section of
the UI (e.g., git clone ssh://git@localhost:2222/username/repo.git).
To shut down RepoQuest, run podman compose down in the same directory. Docker
or Podman volumes associated with the compose service will persist your
configuration and the quest data.
To start a quest after registering, first upload a quest definition bundle (such as rqst-async.tgz), and then start the quest.
Forgejo Actions CI support
In order to support Forgejo Actions, the socket for communicating with Docker or
Podman must be made available to the Forgejo Runner container. For Docker the
default configuration should work with no changes. For rootless Podman, you will
have to start the service that provides the socket and then specify the path to
the socket via the environment variable RQ_DOCKER_HOST.
For example,
systemctl --user start podman.socket
RQ_DOCKER_HOST="$XDG_RUNTIME_DIR/podman/podman.sock" \
    podman compose up --build --detach
Adding a quest
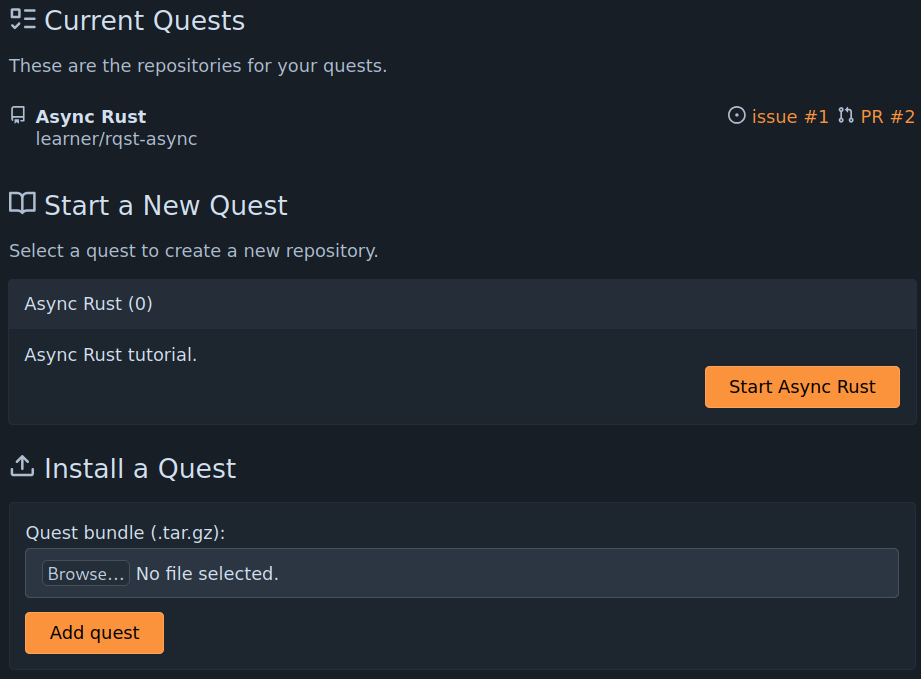
Once you are logged into RepoQuest, the home page will include a section labeled "Install a quest". Select a quest bundle using the "browse" button and then click "add quest" to add the quest to the RepoQuest instance. If the quest is successfully added, a new entry will appear in the "Start a New Quest" section.
Starting a quest
To start a quest, click the "Start" button for the quest under the "Start a New Quest" section. After a few seconds, your browser will be redirected to the issue for the first task of the new quest.
Completing a chapter
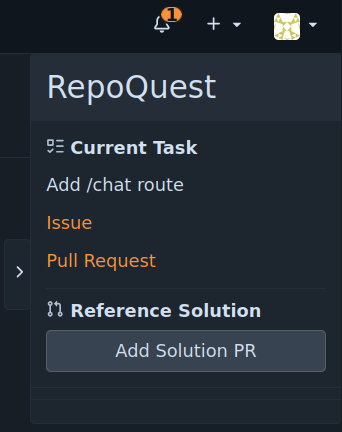
To complete a chapter of a quest, merge the completed pull request for the chapter to main. An issue and pull request for the next chapter will be created automatically.
Using a reference solution
If you require a reference solution for a chapter, press the "Add reference solution" button in the top right of the quest repository interface. The reference solution will be added as pull request into the branch for the current chapter's task.
You can then browse the reference solution or make use of the solution by merging into the branch for the active chapter's task. If you do so, you will still need to finish the chapter by merging the task branch into main.
Authoring quests
RepoQuest is useful for developing tutorials in which a learner progressively extends a single program. Each chapter presents a learner with some scaffolding for a problem and instructions. The learner implements a solution based on the scaffolding, and then the subsequent chapter provides additional scaffolding and instructions that build on the previous solution.
For example, a tutorial for building an interpreter might begin with providing the learner with a datatype defining the syntax tree for a language and the signature for an evaluation function and ask the learner to implement evaluation the function. A subsequent chapter in the quest could add additional cases to the syntax tree datatype and ask the learner to extend the evaluation function, or could add signatures for additional functions over the syntax tree datatype and ask the learner to implement those.
The learner completes the quest using a forge-based interface where each chapter in the quest is completed by merging a branch with the learner's solution into the main branch of a repository.
Two quest representations
RepoQuest makes use of two quest formats. The first represents each scaffolding or solution commit in a quest as a directory. This makes it possible to use git to version control the whole quest sequence.
The second represents the quest as a git repository, where the quest sequence is represented as a linear history of git commits. This representation makes it easier to make edits to the content and structure of the quest.
The walk-through will demonstrate how to make use of each representation when working on a quest.
Dependencies
Many of the RepoQuest commands require the following programs to be available on
your PATH.
gitrsync
Walk-through
This chapter will walk you through the steps of creating a new quest and making various changes and additions to it.
Create a quest
To create a new quest in a directory my-quest, run the following.
repo-quest init my-quest
The init command creates a quest directory my-quest that contains a basic
quest definition.
├── .gitignore
├── quest.toml
├── main
│   ├── initialize-project
│   │   ├── Cargo.lock
│   │   ├── Cargo.toml
│   │   ├── README.md
│   │   └── src
│   │       └── main.rs
│   └── initialize-project.txt
└── chapters
    └── first-chapter
        ├── issue
        │   ├── 01-comment.md
        │   └── 02-comment.md
        ├── issue.md
        ├── pr
        │   └── 01-comment.md
        ├── pr.md
        ├── scaffold
        │   ├── add-test
        │   │   ├── Cargo.lock
        │   │   ├── Cargo.toml
        │   │   ├── README.md
        │   │   └── src
        │   │       └── main.rs
        │   └── add-test.txt
        └── solution
            ├── implement-add
            │   ├── Cargo.lock
            │   ├── Cargo.toml
            │   ├── README.md
            │   └── src
            │       ├── main.rs
            │       └── operations.rs
            └── implement-add.txt
Edit quest.toml to set the title, author, and description of the quest. Also
set the repo value to a name that will be used as the name for the repository
created when a learner starts the quest.
Then, initialize the directory as a git repository and commit everything.
cd my-quest
git init .
git add .
git commit -m "Initial commit"
You can view the current state of the quest (chapters and commits) using
repo-quest tree.
repo-quest ls
Quest Title
├── main
│   └── initialize-project
└── first-chapter
    ├── scaffold
    │   └── add-test
    └── solution
        └── implement-add
Edit the initial commits
The main directory contains the commits that will already be present in the
repository when a learner starts the quest. All quests must have at least one
commit in defined in main. The generated quest contains a single commit,
labeled initialize-project. We will both the README.md file in this commit.
If we edited the README.md file directly, we would also have to edit it in
every later commit in every chapter. Instead, we will use the repo-quest tool
to create a linear-history repository representation of the quest and use
standard git operations to edit the history as a whole.
Run repo-quest hist in the root of the quest definition repository to create
the linear-history representation. The linear-history representation will be
created in a directory named hist in the root of the repository. The hist
directory is already included in the default .gitignore file.
The crated hist directory is a git repository with a branch defined for every
commit. The main branch is not associated with a specific chapter or commit
and instead is for your use in moving between commits to edit the repository.
git log --pretty=oneline --graph --decorate --abbrev-commit --all
* dbe6499 (HEAD -> main, quest/chapter/first-chapter/solution/implement-add) Implement a reference add function
* 2d5d518 (quest/chapter/first-chapter/scaffold/add-test) Add a test that needs to be implemented
* f9dc574 (quest/main/initialize-project) Initial commit
To edit the README.md and have it propagate through the later commits, use
an interactive git rebase and choose to edit the commit.
git rebase -i --update-refs --root
edit f9dc574 # Initial commit
update-ref refs/heads/quest/main/initialize-project

pick 2d5d518 # Add a test that needs to be implemented
update-ref refs/heads/quest/chapter/first-chapter/scaffold/add-test

pick dbe6499 # Implement a reference add function
update-ref refs/heads/quest/chapter/first-chapter/solution/implement-add
Change the content of README.md.
# My Quest

This is an awesome quest where you will do cool things!
Amend the most recent commit with the changes.
git add -u .
git commit --amend --no-edit
Finish the rebase.
git rebase --continue
Commit the changes
The changes to README.md have been propagated through all of the commits in
the linear history representation in hist. Now we just need to apply the
changes to the original quest directory so that we can commit them.
The command repo-quest dirs will apply the changes from the linear-history
representation to the quest definition and update quest.toml. Because the
command makes significant edits to the quest, it will only make the updates if
there are no uncommitted changes to quest.toml, main, or chapters.
[!NOTE] The overwriting of
quest.tomlwill also normalize the structure, so there may be some unexpected changes to the file.
Stage and commit the changes.
git add .
git commit -m "abc"
Add a chapter
To add a new chapter, create a new commit or sequence of commits in the linear-history format and make a branch for each commit with the correct structure.
First, ensure that hist is up-to-date with the directory representation.
[!NOTE] Like with how the
dirscommand checks for changes before overwriting, thehistcommand will not overwrite an existinghistdirectory, so you will need to make sure there's nothing you want to keep, and then remove the directory before continuing.
rm -rf hist
repo-quest hist
Switch to the main branch and move it to the last commit of the last chapter.
cd hist
git switch main
git reset --hard quest/chapter/first-chapter/solution/implement-add
Create the scaffolding
The new chapter will have an additional task, asking the learner to implement some simple functions. The scaffolding commits will add the tests and the solution commits will add the implementations.
In order to reduce the chances of conflicts when incorporating the scaffolding into the learner's repository, try to keep the changes made for scaffolding and the changes made for the solution in separate files. If there is a conflict, the generated pull request for the chapter will discard the learner's changes for earlier chapters and replace them with the reference solutions.
In this quest, the learner will be modifying src/operations.rs and the scaffolding
changes will be to src/main.rs.
Modify the tests in src/main.rs to include the following tests.
#![allow(unused)]
fn main() {
#[test]
fn test_sub() {
    assert_eq!(sub(3,1), 2);
}

#[test]
fn test_mul() {
    assert_eq!(mul(2,3), 6);
}
}
Commit the changes and create a branch to indicate that the commit is a scaffolding commit.
git add -u .
git commit -m "Add sub and mul tests"
git branch -c quest/chapter/sub-and-mul/scaffold/add-tests
When converting back to the directory format, sub-and-mul will become the
label and directory name for the chapter and add-tests will become the label
and directory name for the commit.
Create the reference solution commits
Modify src/operations.rs to add the sub implementation.
#![allow(unused)]
fn main() {
pub fn sub(x: u32, y: u32) -> u32 { x - y }
}
Commit the changes and create a branch to indicate that the commit is a solution commit.
git add -u .
git commit -m "Add sub implementation"
git branch -c quest/chapter/sub-and-mul/solution/add-sub
Modify src/operations.rs to add the mul implementation.
#![allow(unused)]
fn main() {
pub fn mul(x: u32, y: u32) -> u32 { x * y }
}
Commit the changes and create a branch to indicate that the commit is a solution commit.
git add -u .
git commit -m "Add sub implementation"
git branch -c quest/chapter/sub-and-mul/solution/add-mul
Define the task
To continue defining the chapter, we first convert back to the directory format.
repo-quest dirs
If you attempt to view the structure of the quest now with repo-quest ls, you
will see an error:
Error: Could not read issue file "/home/author/my-quest/chapters/sub-and-mul/issue.md"
This is because even though you can defined the commits for a chapter with the linear-history format, you did not define the instructions for the user. To do so, create the mentioned file and add the following content.
+++
title = "Add sub and mul"
+++
Add `sub` and `mul` functions that take and return `u32` to `operations.rs`.
This file defines the Forgejo issue that will be created for the user when they
start the chapter. The metadata block delimited by the +++ marks is TOML and
defines the title of the issue. The remainder of the file is Markdown and will
become the body of the issue.
Once you have saved the file, you can run repo-quest ls again and you will see
the structure of the quest with the new chapter and commits added.
Quest Title
├── main
│   └── initialize-project
├── first-chapter
│   ├── scaffold
│   │   └── add-test
│   └── solution
│       └── implement-add
└── sub-and-mul
    ├── scaffold
    │   └── add-tests
    └── solution
        ├── add-sub
        └── add-mul
Stage and commit the changes to the quest with git.
cd ..
git add .
git commit -m "Add sub-and-mul chapter"
Test the quest commits
In order to test each commit of a quest, you can define a test command in
quest.toml. The command defined when creating a quest with repo-quest init
is cargo test.
test-cmd = [
    "cargo",
    "test",
]
The command repo-quest test runs the command for each commit. The output of
repo-quest test indicates for each commit whether the result was the expected
one or not and whether the test passed or failed.
EXPECTED RESULT: PASSED "/home/theo/work/trust2/example/my-quest/main/initialize-project"
EXPECTED RESULT: FAILED "/home/theo/work/trust2/example/my-quest/chapters/first-chapter/scaffold/add-test"
EXPECTED RESULT: PASSED "/home/theo/work/trust2/example/my-quest/chapters/first-chapter/solution/implement-add"
UNEXPECTED RESULT: FAILED "/home/theo/work/trust2/example/my-quest/chapters/sub-and-mul/scaffold/add-tests"
UNEXPECTED RESULT: FAILED "/home/theo/work/trust2/example/my-quest/chapters/sub-and-mul/solution/add-sub"
EXPECTED RESULT: PASSED "/home/theo/work/trust2/example/my-quest/chapters/sub-and-mul/solution/add-mul"
Error: There were unexpected test failures.
Commits that should have the tests fail can be marked to expect failure. For
example, the first commit of first-chapter adds a test for which the called
functions are not implemented, so the registered test command cargo test
should fail. The scaffold commit for first-chapter is marked for expecting
failure, but the scaffold commit and one of the solution commits for the
sub-and-mul chapter are not.
To mark them as expecting to fail, change the chapter definition to the following.
[[chapters]]
label = "sub-and-mul"
scaffold = [
    {label = "add-tests", expected = "fail"}
]
solution = [
    {label = "add-sub", expected = "fail"},
    "add-mul",
]
[!NOTE] The above format is not the format that
repo-quest dirswill produce. If you want to match that format, use the following instead:[[chapters]] label = "sub-and-mul" solution = [ { label = "add-sub", expected = "fail" }, "add-mul", ] [[chapters.scaffold]] label = "add-tests" expected = "fail"
Stage and commit the changes with git.
git add .
git commit -m "Fix test expectations"
Bundle the quest
Once your quest is ready for distribution, create the quest bundle with
repo-quest bundle.
repo-quest bundle --output my-quest.tgz
This file can be uploaded to a RepoQuest Forgejo instance to run the quest.
Quest definition structure overview and glossary
This page give an overview of the structure of a quest definition and defines some terms used in this documentation by means of an example quest.
├── .git
├── .gitignore
├── quest.toml
├── main
│   ├── initialize-project
│   │   ├── Cargo.lock
│   │   ├── Cargo.toml
│   │   ├── README.md
│   │   └── src
│   │       └── main.rs
│   └── initialize-project.txt
└── chapters
    └── first-chapter
        ├── issue
        │   ├── 01-comment.md
        │   └── 02-comment.md
        ├── issue.md
        ├── pr
        │   └── 01-comment.md
        ├── pr.md
        ├── scaffold
        │   ├── add-test
        │   │   ├── Cargo.lock
        │   │   ├── Cargo.toml
        │   │   ├── README.md
        │   │   └── src
        │   │       └── main.rs
        │   └── add-test.txt
        └── solution
            ├── implement-add
            │   ├── Cargo.lock
            │   ├── Cargo.toml
            │   ├── README.md
            │   └── src
            │       ├── main.rs
            │       └── operations.rs
            └── implement-add.txt
The quest.toml contains the quest metadata, such as the title and author of
the quest. It also contains the chapter listing for the quest, which defines the
order of the chapters and of the commits within a chapter.
The main directory contains several directories and text files. Each directory
and text file represents a commit and commit message. The commits defined within
the main directory will be included in the learner's quest repository at the
start of the quest, before any tasks have been completed.
The chapters directory contains a sub-directory defining each chapter in the
quest. Each chapter may contain a scaffold directory containing directories
and text files representing commits and commit messages that represent the
scaffolding code provided to the learner upon starting a chapter. The chapter
must contain a solution directory which contains the commits and commit
messages representing a reference solution which builds on the scaffolding
code.
[!NOTE] The word "commit" is used to describe a few different things for the various repository representations. The documentation here will attempt to distinguish between them as clearly as possible by specifying "chapter commit", "scaffolding commit", or "solution commit" when referring to one of the commits within a chapter or specifically one of the scaffold or solution commits. Commits within the
maindirectory will also be referred to a "chapter commits" even though the content ofmaincomes before any chapter.
The folder names are not required to be prefixed with a number. The name of the folder will sometimes be referred to as the chapter label and will be the basis of the chapter branch name when converting to the linear history format of the quest.
Each chapter must have a task description contained in an issue.md file. The
content of that issue will be presented to the learner as an issue within
Forgejo. Each chapter may additionally have a pr.md file which contains
additional task information specifically pertaining to the scaffolding code for
the task. The content of the file will be included in the initial pull request
generated for the task.
The issue and pr folders contain additional file which will be presented as
comments on the issue or pull request. See the
reference for more information about the
additional metadata that can be included with those files.
This hist directory contains a linear-history representation of the quest,
which may be easier to edit than the directory representation for some quest
creation or maintenance tasks. The RepoQuest binary includes utilities for
converting between the directory representation and linear-history
representation.
Converting an existing tutorial to a quest
The process for converting an existing tutorial to a quest depends on the structure of the tutorial.
If it is already represented as a sequence of scaffolding and reference solution directories, where each directory is a complete snapshot of the state of the quest, then the easiest way is probably to manually adapt the directory structure to match the directory-based format and add the additional required metadata.
If the quest is not represented like that, then the easiest way is probably to
do the tutorial within a git repository, committing each scaffolding and
solution step as you go. Then add the metadata required to match the
repository-based format and convert the
repository to the directory based structure using the repoquest
binary.
Recommendations for quest development
- Only edit branches for commits as part of a
rebase --update-refscommand, to ensure that the changes propagate forward. This means usinggit resetto move themainbranch around to make edits and usinggit branch -cto name label the commits with branch names that RepoQuest knows how to interpret.
RepoQuest binary
The individual commands for the RepoQuest authoring binary are documented within
the binary itself. That documentation can be viewed by passing the --help flag
to repoquest itself or to any of the subcommands.
Quest directory format
The following diagram attempts to capture the general "grammar" of the quest directory format. The individual parts are described below. For a concrete example, see the authoring walkthrough.
├── quest.toml (Required)
├── main (Required, and at least one entry required)
│   ├── commit/
│   ├── commit.txt
│   └── ...
└── chapters (Required, and at least one entry required)
    ├── chapter
    │   ├── issue (Optional)
    │   │   ├── issue-comment.md
    │   │   └── ...
    │   ├── issue.md (Required)
    │   ├── pr (Optional)
    │   │   ├── pr-comment.md
    │   │   └── ...
    │   ├── pr.md (Optional)
    │   ├── scaffold (Optional)
    │   │   ├── commit/
    │   │   ├── commit.txt
    │   │   └── ...
    │   └── solution (Required, and at least one entry required)
    │       ├── commit/
    │       ├── commit.txt
    │       └── ...
    └── ...
-
quest.toml: Contains the metadata about the quest definition. See below for the definition of the keys in the file. -
main/: Directory containing commits that will be included in the learner's repository upon starting the quest, before any chapter has been completed. This must contain at least one entry. -
chapters/: Directory containing directories defining the chapters of the quest. This must contain at least one entry. -
chapter/: Directory defining a chapter. The name of the directory is the chapter label, which must appear inquest.toml. -
commit/: Directory containing the contents of a commit. The name of the directory is the commit label, which must appear inquest.toml. -
commit.txt: Plain-text file containing the commit message of a commit. The name of the file must match the name of the corresponding commit directory. -
issue.md: Markdown file with TOML frontmatter delimited by+++fences. This defines the Forgejo issue that will be created for the learner when the learner starts a chapter. The frontmatter must define exactly the keytitlewhich is a string that will be used for the title of the issue. -
issue/: Directory containing files defining comments that will be created on the generated issue when a chapter is started. The comment files are interpreted in lexical order of filename, and so the convention is to prefix them with a numeric value. -
issue-comment.md: Markdown file with no frontmatter. The content of this file will be the content of a comment on the generated Forgejo issue for the chapter. -
pr.md: Markdown file with TOML frontmatter delimited by+++fences. This defines the Forgejo pull request that will be created for the learner when the learner starts a chapter. The frontmatter must define exactly the keytitlewhich is a string that will be used for the title of the issue.If omitted, the generated pull request will have a standard body that links to the issue and will use the same title as the issue.
-
pr/: Directory containing files defining comments that will be created on the generated pull request when a chapter is started. The comment files are interpreted in lexical order of filename, and so the convention is to prefix them with a numeric value.The comments can be defined even if
pr.mdis omitted. -
pr-comment.md: Markdown file with TOML frontmatter delimited by+++fences. The content of this file will be the content of a comment on the generated Forgejo pull request for the chapter.The frontmatter, if provided, defines a quote of the code in the pull request. The frontmatter, if provided, must contain exactly the keys
file,end-line-side, andend-line. The value forend-line-sidemust either be the string"right"or"left", where"right"means the result of the pull request and"left"means the base of the pull request. The value forfilemust be a string that names a file (in the result or base of the pull request, depending onend-line-side), relative to the root of the commit directory. The value forend-linemust be an integer that is the last line number of the code to quote.
quest.toml
The quest.toml file defines metadata about and the structure of the quest. The
following keys are supported:
-
title: Required. A string defining the quest title. -
author: Required. A string defining the quest author. -
repo: Required. A string defining the name to use for the Forgejo repository generated for the learner when they start the quest. -
rq-version: Required. A string defining the compatible version of repo-quest. Not currently checked. -
description: Require.d A string defining a short description of the quest to be presented to the learner when they install the quest. -
test-cmd: Optional. An array of strings giving a command to execute in each commit directory whenrepo-quest testis invoked. -
main: Required. A non-empty array of commit information. See below for the structure of the commit information. -
chapters: Required. A non-empty array of tables defining the chapters in a quest. The order of the chapters in this array is the order of the in which the chapters are interpreted.Each chapter table must have the key
labelwhose value is the chapter label as a string. Each chapter may optionally have the keyscaffoldwhose value is an array of commit information. Each chapter must have the keysolutionwhose value is a non-empty array of commit information.
Commit information is given as either a string or table. If a string, then the
string is interpreted as the label of the commit. The label must exist in the
corresponding chapter or main/ directory. If a table, then the table has two
keys. The key label is required. The value for label is a string that gives
the chapter label. The key expected is optional. The value for expected may
be the string "pass" or the string "fail". If omitted or if a just string is
given for the chapter information, "pass" is assumed. The value indicates
whether the test command is expected to pass or fail for that commit.
.git
Some repo-quest operations assume that the quest directory is committed to a
Git repository. If the quest is not committed, those commands will produce an
error.
Quest repository format
The linear-history repository format for a quest makes it easier to make edits to the content and structure of the quest. This format does not include all of the information required to define a quest: for example, it omits task instructions. It does include the chapter structure, commits, and commit messages.
The repository format consists of a git repository with a linear history of commits. Each commit has a corresponding branch whose name has one of the following formats:
quest/main/commit-label,quest/chapter/chapter-label/scaffold/commit-label, orquest/chapter/chapter-label/solution/commit-label,
where each of the commit-label and chapter-label components are replaced by
concrete commit and chapter labels.
The commits with branches of the form quest/main/commit-label correspond to
the commits in the directory structure in the main directory. The commits the
other format correspond to the scaffold or reference solution commits for a
chapter with the given label.
All commits for a chapter must be adjacent, all commits for quests/main
must come before any chapter commits, and all commits must have exactly one
branch with the given format.